
Hay muchos desarrolladores de código abierto que desean mostrar sus habilidades desarrollando aplicaciones web. Cada desarrollador intenta mostrar algo nuevo. O algunos desarrolladores intentan automatizar sus tareas. De acuerdo con el investigador hacking ético del Instituto Internacional de Seguridad Cibernética (IICS), existen muchas fases desde el desarrollo de la aplicación web hasta su implementación. Pero en el desarrollo de cualquier aplicación web, la seguridad de la infraestructura debe considerarse siempre como prioridad principal. Cada desarrollador verifica los ataques externos en su aplicación. Pero en la fase de desarrollo todo debe hacerse de forma segura. Las aplicaciones web deben ser desarrolladas de forma segura. Mostraremos un script que se utiliza para proteger cualquier servidor de Linux o servidores web locales o el servidor de Linux de refuerzo en el que los desarrolladores implementarán su sitio web.
LAMP
LAMP es una utilidad de código abierto utilizada para crear aplicaciones web. Los expertos también se refieren a LAMP como Lamp Stack porque consta de cuatro capas.

LAMP significa (Linux, Apache, MySQL y PHP). Muchos desarrolladores utilizaron LAMP para desarrollar e implementar aplicaciones web. JShielder se utiliza para proteger servidores Linux en los que los desarrolladores desean implementar sus aplicaciones web. Jshielder automatiza el proceso de instalación de los paquetes necesarios para hospedar aplicaciones web. En otras palabras, JShielder actúa como un fortalecimiento del servidor (el fortalecimiento del servidor es un proceso para mejorar la seguridad del servidor) Algunos consejos comunes sobre el fortalecimiento del servidor incluyen:
- Cifrado de datos para la comunicación
- Cambia los protocolos que envían información importante en texto plano
- Cierra los servicios innecesarios que se ejecutan en el servidor
- Mantenga el sistema operativo actualizado, especialmente los parches de seguridad y las herramientas de eliminación de malware
- Regularmente actualizar las políticas de seguridad
- Mantiene y revisa regularmente los registros del servidor
Jshielder requiere las siguientes configuraciones
- Configura un nombre de host
- Reconfigura la zona horaria
- Actualiza todo el sistema
- Crea un nuevo usuario administrador para que pueda administrar su servidor de forma segura sin necesidad de hacer conexiones remotas con root
- Ayuda al usuario a generar claves RSA seguras, para que el acceso remoto a su servidor se realice de forma exclusiva desde su computadora local y no tenga una contraseña convencional
- Configura, optimiza y asegura el servidor SSH (algunas configuraciones después del punto de referencia CIS)
- Configura las reglas de IPTABLES para proteger al servidor de ataques comunes
- Deshabilita los sistemas de archivos y protocolos de red no utilizados
- Protege el servidor contra ataques de fuerza bruta instalando un fail2ban de configuración
- Instala y configura Artillery como una herramienta de Honeypot, monitoreo, bloqueo y alerta
- Instala PortSentry
- Instalar, configurar y optimizar MySQL
- Instalar el servidor web Apache
- Instalar, configurar y asegurar PHP
- Asegure Apache a través del archivo de configuración y con la instalación de los Módulos ModSecurity, ModEvasive, Qos y SpamHaus
- Asegura NginX con la instalación del módulo ModSecurity NginX
- Instala RootKit Hunter
- Protege Root Home y Grub Configuration Files
- Instala Unhide para ayudar a detectar procesos ocultos maliciosos
- Instala Tiger, un sistema de prevención de intrusiones y auditoría de seguridad.
- Restringir el acceso a los archivos de configuración de Apache
- Deshabilita compiladores
- Crea un trabajo Daily Cron para las actualizaciones del sistema
- Kernel Hardening a través del archivo de configuración sysctl (Tweaked)
- / tmp endurecimiento de directorio
- Instalación de IDAD PSAD
- Habilita la contabilidad de procesos
- Habilita actualizaciones desatendidas de MOTD y banners para acceso no autorizado
- Desactiva la compatibilidad con USB para mejorar la seguridad (opcional)
- Configura un UMASK predeterminado restrictivo
- Configura y habilita Auditd
- Configura las reglas de Auditd siguiendo CIS Benchmark
- Instalar syststat
- ArpWatch instalar
- Pasos adicionales de endurecimiento después de la prueba de referencia CIS asegura Cron
- Automatiza el proceso de configuración de una contraseña del gestor de arranque GRUB
- Asegura la configuración de arranque
- Establece permisos de archivos seguros para archivos críticos del sistema
Según el investigador de hacking ético del Instituto Internacional de Seguridad Cibernética, los administradores de red requieren todos los puntos anteriores para proteger sus servidores.
Instalación de Jshield
- Para las pruebas utilizaremos Ubuntu 18.04 LTS. Antes de usar JShielder, LAMP debe instalarse y configurarse en su sistema Linux. LAMP es solo XAMPP que se usa principalmente en el sistema operativo Windows
- Para instalar LAMP abra el terminal y escriba sudo apt-get update && Para instalar mysql escriba sudo apt-get install mysql-server mysql-client
root@ubuntu:/home/iicybersecurity# sudo apt-get update
 Hit:1 https://security.ubuntu.com/ubuntu bionic-security InRelease
 Hit:2 https://us.archive.ubuntu.com/ubuntu bionic InRelease
 Hit:3 https://us.archive.ubuntu.com/ubuntu bionic-updates InRelease
 Hit:4 https://us.archive.ubuntu.com/ubuntu bionic-backports InRelease
 Reading package lists… Done
root@ubuntu:/home/iicybersecurity# sudo apt-get install mysql-server
 Reading package lists… Done
 Building dependency tree
 Reading state information… Done
 The following additional packages will be installed:
   libaio1 libevent-core-2.1-6 libhtml-template-perl mysql-client-5.7 mysql-client-core-5.7 mysql-server-5.7
   mysql-server-core-5.7
 Suggested packages:
   libipc-sharedcache-perl mailx tinyca
 The following NEW packages will be installed:
   libaio1 libevent-core-2.1-6 libhtml-template-perl mysql-client-5.7 mysql-client-core-5.7 mysql-server mysql-server-5.7
   mysql-server-core-5.7
- Para instalar apache escriba sudo apt-get install apache2 apache2-doc apache2-utils libexpat1 ssl-cert
root@ubuntu:/home/iicybersecurity# sudo apt-get install apache2 apache2-doc apache2-utils libexpat1 ssl-cert
 Reading package lists… Done
 Building dependency tree
 Reading state information… Done
 ssl-cert is already the newest version (1.0.39).
 libexpat1 is already the newest version (2.2.5-3ubuntu0.1).
 The following additional packages will be installed:
   apache2-bin apache2-data libapr1 libaprutil1 libaprutil1-dbd-sqlite3 libaprutil1-ldap liblua5.2-0
 Suggested packages:
   apache2-suexec-pristine | apache2-suexec-custom
 The following NEW packages will be installed:
   apache2 apache2-bin apache2-data apache2-doc apache2-utils libapr1 libaprutil1 libaprutil1-dbd-sqlite3
   libaprutil1-ldap liblua5.2-0
- Para instalar PHP, escriba sudo apt-get install php && sudo apt-get install phpmyadmin. Este comando le pedirá que reconfigure el servidor de apache. Debe seleccionar apache y luego le pedirá que configure la contraseña para mysql. Ingrese la contraseña segura y todas las dependencias serán configuradas. La contraseña debe ser altamente segura, como se menciona en el curso del Instituto Internacional de Seguridad Cibernética
root@ubuntu:/home/iicybersecurity# sudo apt-get install php
 Reading package lists… Done
 Building dependency tree
 Reading state information… Done
 The following additional packages will be installed:
   libapache2-mod-php7.2 php-common php7.2 php7.2-cli php7.2-common php7.2-json php7.2-opcache php7.2-readline
 Suggested packages:
   php-pear
 The following NEW packages will be installed:
   libapache2-mod-php7.2 php php-common php7.2 php7.2-cli php7.2-common php7.2-json php7.2-opcache php7.2-readline
 0 upgraded, 9 newly installed, 0 to remove and 387 not upgraded.
 Need to get 3,863 kB of archives.
root@ubuntu:/home/iicybersecurity# sudo apt-get install phpmyadmin
 Reading package lists… Done
 Building dependency tree
 Reading state information… Done
 The following additional packages will be installed:
   dbconfig-common dbconfig-mysql libjs-sphinxdoc libzip4 php-bz2 php-curl php-gd php-mbstring php-mysql php-pear
   php-php-gettext php-phpseclib php-tcpdf php-xml php-zip php7.2-bz2 php7.2-curl php7.2-gd php7.2-mbstring php7.2-mysql
   php7.2-xml php7.2-zip
 Suggested packages:
   php-libsodium php-mcrypt php-gmp php-imagick
 The following NEW packages will be installed:
   dbconfig-common dbconfig-mysql libjs-sphinxdoc libzip4 php-bz2 php-curl php-gd php-mbstring php-mysql php-pear
   php-php-gettext php-phpseclib php-tcpdf php-xml php-zip php7.2-bz2 php7.2-curl php7.2-gd php7.2-mbstring php7.2-mysql
   php7.2-xml php7.2-zip phpmyadmin
- Ahora escriba git clone https://github.com/Jsitech/JShielder.git
root@ubuntu:/home/iicybersecurity/Downloads# git clone https://github.com/Jsitech/JShielder.git
 Cloning into 'JShielder'…
 remote: Enumerating objects: 70, done.
 remote: Counting objects: 100% (70/70), done.
 remote: Compressing objects: 100% (44/44), done.
 remote: Total 1192 (delta 48), reused 46 (delta 26), pack-reused 1122
 Receiving objects: 100% (1192/1192), 1.09 MiB | 764.00 KiB/s, done.
 Resolving deltas: 100% (624/624), done.
- Luego escriba cd JShielder && ls JShielder se desarrolla en un script bash
root@ubuntu:/home/iicybersecurity# cd Downloads/JShielder/
root@ubuntu:/home/iicybersecurity/Downloads/JShielder# ls
 'CentOS_7(Under Development)'   jshielder.sh   LICENSE   README.md   UbuntuServer_16.04LTS   UbuntuServer_18.04LTS
- Escriba ./jshielder.sh
root@myserver1:/home/iicybersecurity/Downloads/JShielder# ./jshielder.sh
     ██╗███████╗██╗  ██╗██╗███████╗██╗     ██████╗ ███████╗██████╗
     ██║██╔════╝██║  ██║██║██╔════╝██║     ██╔══██╗██╔════╝██╔══██╗
     ██║███████╗███████║██║█████╗  ██║     ██║  ██║█████╗  ██████╔╝
██   ██║╚════██║██╔══██║██║██╔══╝  ██║     ██║  ██║██╔══╝  ██╔══██╗
╚█████╔╝███████║██║  ██║██║███████╗███████╗██████╔╝███████╗██║  ██║
╚════╝ ╚══════╝╚═╝  ╚═╝╚═╝╚══════╝╚══════╝╚═════╝ ╚══════╝╚═╝  ╚═╝

Automated Hardening Script for Linux Servers
Developed By Jason Soto @JsiTech
---------------------------------------------------------------------------------------------------------
[+] SELECT YOUR LINUX DISTRIBUTION
---------------------------------------------------------------------------------------------------------

1. Ubuntu Server 16.04 LTS
2. Ubuntu Server 18.04 LTS
3. Linux CentOS 7 (Coming Soon)
4. Debian GNU/Linux 8 (Coming Soon)
5. Debian GNU/Linux 9 (Coming Soon)
6. Red Hat Linux 7 (Coming Soon)
7. Exit

2- Escriba 2
[+] SELECT THE DESIRED OPTION
1. LAMP Deployment
2. LEMP Deployment
3. Reverse Proxy Deployment With Apache
4. Running With SecureWPDeployer or JSDeployer Script
5. Customized Run (Only run desired Options)
6. CIS Benchmark Hardening
Exit

1
- Escriba 1
[+] Setting some Prerequisites
 [ +++++++++++++++++++++++++++++++++++++++++++++++++++++   ]'universe' distribution component is already enabled for all sources.
 Done.
  To EXIT Press x Key, Press ENTER to Continue
- Entonces se mostrará que el componente distribuido universal está habilitado
- Presione enter para configurar más.
- Ingrese Y y escriba mysql1
- Y luego ingrese a www.testsite1.com
¿Do you Wish to Set a HostName? (y/n): y
Type a Name to Identify this server :
  (For Example: myserver): mysql1
¿Type Domain Name?:www.testsite1.com

Creating legal Banners for unauthorized access
 [ +++++++++++++++++++++++++++++++++++++++++++++++++++++   ]OK
 Done.
  To EXIT Press x Key, Press ENTER to Continue
- Luego configure la zona horaria
[+] We will now Configure the TimeZone
 Current default time zone: 'America/Los_Angeles'
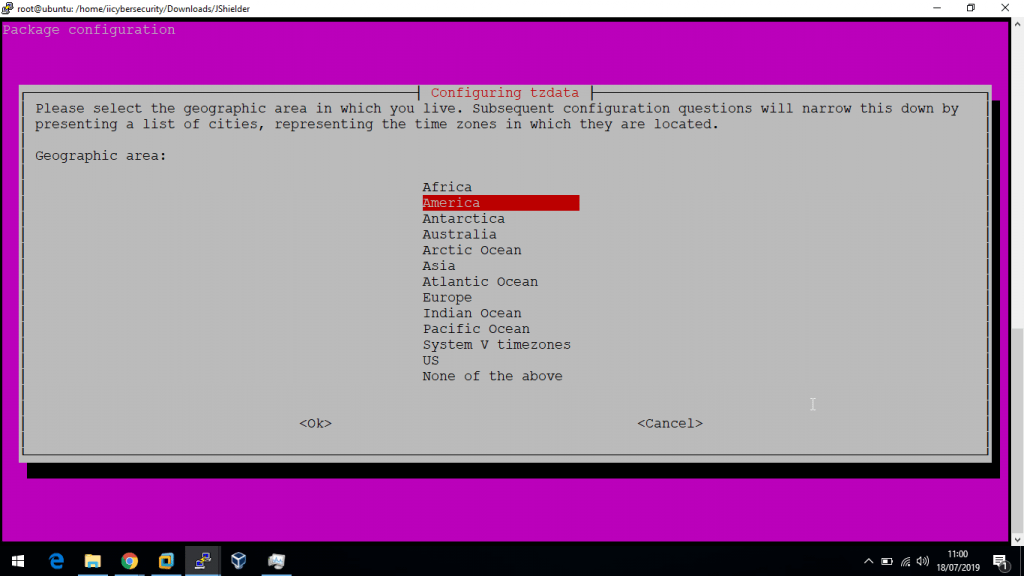
- Luego selecciones el país
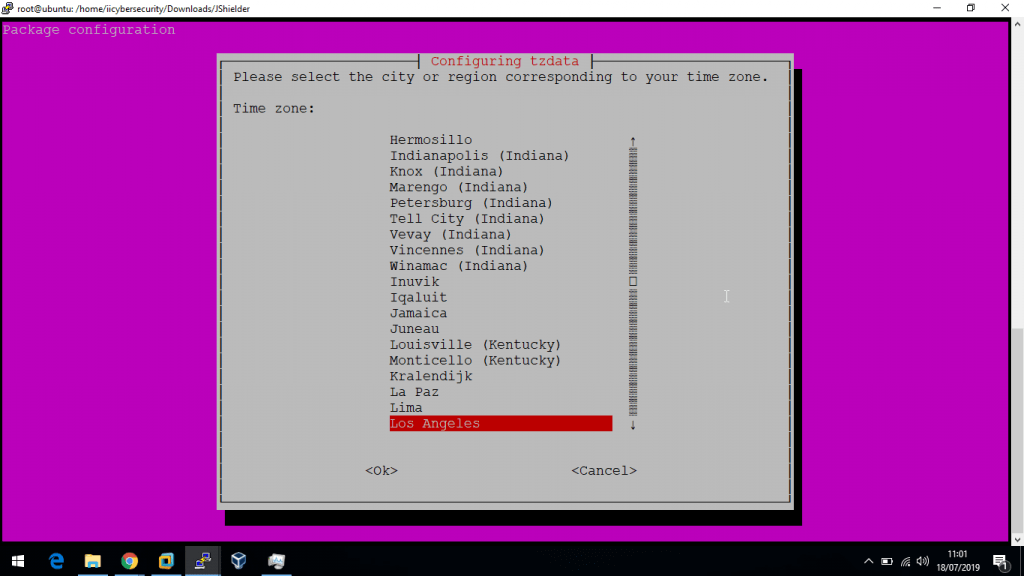
[+] We will now Configure the TimeZone
 Current default time zone: 'America/Los_Angeles'
 Local time is now:      Wed Jul 17 22:31:34 PDT 2019.
 Universal Time is now:  Thu Jul 18 05:31:34 UTC 2019.
 Done.

  To EXIT Press x Key, Press ENTER to Continue
- Entonces el servidor ejecutará una actualización. Este comando buscará actualizaciones disponibles para el sistema e instalará las actualizaciones requeridas
- Puede tomar tiempo dependiendo de su velocidad de Internet
[+] Updating the System
 Hit:1 https://security.ubuntu.com/ubuntu bionic-security InRelease
 Hit:2 https://us.archive.ubuntu.com/ubuntu bionic InRelease
 Hit:3 https://us.archive.ubuntu.com/ubuntu bionic-updates InRelease
 Hit:4 https://us.archive.ubuntu.com/ubuntu bionic-backports InRelease
 Reading package lists… Done
 Building dependency tree
 Reading state information… Done
 387 packages can be upgraded. Run 'apt list --upgradable' to see them.
 Reading package lists… Done
 Building dependency tree
 Reading state information… Done
 Calculating upgrade… Done
 The following package was automatically installed and is no longer required:
   libllvm7
 Use 'sudo apt autoremove' to remove it.
 The following NEW packages will be installed:
   gstreamer1.0-gtk3 libllvm8 linux-headers-4.18.0-25 linux-headers-4.18.0-25-generic linux-image-4.18.0-25-generic
   linux-modules-4.18.0-25-generic linux-modules-extra-4.18.0-25-generic python3-dateutil
 The following packages will be upgraded:

apport apport-gtk apt apt-utils aptdaemon aptdaemon-data bash bind9-host binutils binutils-common
   binutils-x86-64-linux-gnu busybox-initramfs busybox-static bzip2 console-setup console-setup-linux cpp cups

Done.
  To EXIT Press x Key, Press ENTER to Continue
- Después de instalar las actualizaciones presiona enter
 [+] Setting UMASK to a more Restrictive Value (027)
 [ ++++++++++++++++++++++++++++++++++++++++++++++++++++++  ]
 OK
 Done.
  To EXIT Press x Key, Press ENTER to Continue
- Jshielder habilitará la seguridad bloqueando o inhabilitando componentes innecesarios
 [+] Disabling Unused FileSystems
 [ ++++++++++++++++++++++++++++++++++++++++++++++++++++++  ] OK
 Done.
  To EXIT Press x Key, Press ENTER to Continue
- Ahora JShielder bloqueará los puertos de red poco comunes para restringir el escaneo de fuentes externas utilizadas en las fases de hacking ético de pentesting
[+] Disabling Uncommon Network Protocols
 [ ++++++++++++++++++++++++++++++++++++++++++++++++++++++  ] OK
 Done.
  To EXIT Press x Key, Press ENTER to Continue
- Crear nuevo usuario. Ingrese nombre de usuario y contraseña
- Introduzca el nombre de usuario testuser1 y la contraseña 123456
- Ingresa y
[+] We will now Create a New User Type the new username: testuser1 Adding usertestuser1' ... Adding new grouptestuser1' (1001) … Adding new usertestuser1' (1001) with grouptestuser1' … Creating home directory/home/testuser1' ... Copying files from/etc/skel' … Enter new UNIX password: Retype new UNIX password: passwd: password updated successfully Changing the user information for testuser1 Enter the new value, or press ENTER for the default Full Name []:Room Number []:Work Phone []:Home Phone []:Other []:Is the information correct? [Y/n] y Done. To EXIT Press x Key, Press ENTER to Continue
[+] Instructions to Generate an RSA KEY PAIR
 *** IF YOU DONT HAVE A PUBLIC RSA KEY, GENERATE ONE ***
      Follow the Instruction and Hit Enter When Done
      To receive a new Instruction
 RUN THE FOLLOWING COMMANDS  a) ssh-keygen -t rsa -b 4096
- Copie y pegue el comando anterior en el mismo terminal y pulse enter
ssh-keygen -t rsa -b 4096b) cat /home/testuser1/.ssh/id_rsa.pub >> /home/testuser1/.ssh/authorized_keysDone. To EXIT Press x Key, Press ENTER to Continue Run the Following Command to copy the Key Press ENTER when done ssh-copy-id -i /root/.ssh/id_rsa.pub testuser1@192.168.1.11 Done. To EXIT Press x Key, Press ENTER to Continue [+] Securing SSH [ ++++++++++++++++++++++++++++++++++++++++++++++++++++++ ]OK chattr: No such file or directory while trying to stat /home/testuser1/.ssh/authorized_keys Done. To EXIT Press x Key, Press ENTER to Continue
- De SSH será asegurado. Luego instalará Fail2ban que funciona como sistema de prevención de intrusos. Su principal motivo es proteger de los ataques de fuerza bruta
[+] Setting IPTABLE RULES
 [ +++++++++++++++++++++++++++++++++++++++++++++++++++++++ ]
 Done.
  To EXIT Press x Key, Press ENTER to Continue

[+] Installing Fail2Ban
 Reading package lists… Done
 Building dependency tree
 Reading state information… Done
 The following package was automatically installed and is no longer required:
   libllvm7
 Use 'sudo apt autoremove' to remove it.
 The following additional packages will be installed:
   liblockfile-bin liblockfile1 lockfile-progs procmail sendmail-base sendmail-bin sendmail-cf sensible-mda
 Suggested packages:
   sendmail-doc rmail logcheck resolvconf sasl2-bin
 The following NEW packages will be installed:
   liblockfile-bin liblockfile1 lockfile-progs procmail sendmail sendmail-base sendmail-bin sendmail-cf sensible-mda
 0 upgraded, 9 newly installed, 0 to remove and 1 not upgraded.
 374 not fully installed or removed.
 Need to get 899 kB of archives.
 After this operation, 4,449 kB of additional disk space will be used.
 Do you want to continue? [Y/n] Y
- Luego eliminará python-pyinotifiy e ingrese Y para eliminar la dependencia de python
Use 'sudo apt autoremove' to remove it.
 The following additional packages will be installed:
   python3-pyinotify whois
 Suggested packages:
   mailx monit sqlite3 python-pyinotify-doc
 The following NEW packages will be installed:
   fail2ban python3-pyinotify whois
 0 upgraded, 3 newly installed, 0 to remove and 1 not upgraded.
 Need to get 398 kB of archives.
 After this operation, 2,110 kB of additional disk space will be used.
 Do you want to continue? [Y/n] Y
 Get:1 https://us.archive.ubuntu.com/ubuntu bionic/universe amd64 fail2ban all 0.10.2-2 [329 kB]

Created symlink /etc/systemd/system/multi-user.target.wants/fail2ban.service → /lib/systemd/system/fail2ban.service.
 Processing triggers for ureadahead (0.100.0-21) …
 Setting up whois (5.3.0) …
 Processing triggers for systemd (237-3ubuntu10.24) …
 Processing triggers for man-db (2.8.3-2ubuntu0.1) …
 Setting up python3-pyinotify (0.9.6-1) …
 Done.
  To EXIT Press x Key, Press ENTER to Continue
- Luego se instalará mysql
[+] Installing, Configuring and Optimizing MySQL
 Reading package lists… Done
 Building dependency tree
 Reading state information… Done
 mysql-server is already the newest version (5.7.26-0ubuntu0.18.04.1).
 The following package was automatically installed and is no longer required:
   libllvm7
 Use 'sudo apt autoremove' to remove it.
 0 upgraded, 0 newly installed, 0 to remove and 1 not upgraded.
 [ +++++++++++++++++++++++++++++++++++++++++++++++++++++++ ] OK
 Securing the MySQL server deployment.

 Connecting to MySQL using a blank password.\

 VALIDATE PASSWORD PLUGIN can be used to test passwords
 and improve security. It checks the strength of password
 and allows the users to set only those passwords which are
 secure enough. Would you like to setup VALIDATE PASSWORD plugin?

 Press y|Y for Yes, any other key for No:y
- Elija la política de contraseña. Ingrese 1
There are three levels of password validation policy:
 LOW    Length >= 8
 MEDIUM Length >= 8, numeric, mixed case, and special characters
 STRONG Length >= 8, numeric, mixed case, special characters and dictionary                  file
 Please enter 0 = LOW, 1 = MEDIUM and 2 = STRONG: 1

New password:

Re-enter new password:

Estimated strength of the password: 100
 Do you wish to continue with the password provided?(Press y|Y for Yes, any other key for No) :y
- Ingrese y y elimine el usuario anónimo para mejorar la seguridad del mysql. Esto restringirá el inicio de sesión anónimo en mysql. Según el experto en forense digital de iicybersecurity, algunos administradores de bases de datos dejan el inicio de sesión anónimo, lo que ayuda aún más en los ataques
By default, a MySQL installation has an anonymous user,
 allowing anyone to log into MySQL without having to have
 a user account created for them. This is intended only for
 testing, and to make the installation go a bit smoother.
 You should remove them before moving into a production
 environment.
 Remove anonymous users? (Press y|Y for Yes, any other key for No) :y
- Esto depende totalmente del requisito de si se debe dar acceso remoto a la raíz o no. Así entraremos en n
 Normally, root should only be allowed to connect from
 'localhost'. This ensures that someone cannot guess at
 the root password from the network.
 Disallow root login remotely? (Press y|Y for Yes, any other key for No): n
- Elimine el usuario de prueba que viene por defecto en mysql. Ingrese y
By default, MySQL comes with a database named 'test' that
 anyone can access. This is also intended only for testing,
 and should be removed before moving into a production
 environment.
 Remove test database and access to it? (Press y|Y for Yes, any other key for No) : y

 Dropping test database…
 Success.

 Removing privileges on test database…
 Success.

 Reloading the privilege tables will ensure that all changes
 made so far will take effect immediately.
 Reload privilege tables now? (Press y|Y for Yes, any other key for No) :y

Success.
 All done!
 Done.
  To EXIT Press x Key, Press ENTER to Continue
- Entonces apache en el servidor web
[+] Installing Apache Web Server
 Reading package lists… Done
 Building dependency tree
 Reading state information… Done
 apache2 is already the newest version (2.4.29-1ubuntu4.7).
 The following package was automatically installed and is no longer required:
   libllvm7
 Use 'sudo apt autoremove' to remove it.
 0 upgraded, 0 newly installed, 0 to remove and 1 not upgraded.
 Done.
  To EXIT Press x Key, Press ENTER to Continue
- Luego se instalarán los archivos requeridos de PHP
[+] Installing, Configuring and Optimizing PHP
 Reading package lists… Done
 Building dependency tree
 Reading state information… Done
 php is already the newest version (1:7.2+60ubuntu1).
 php-pear is already the newest version (1:1.10.5+submodules+notgz-1ubuntu1.18.04.1).
 php-pear set to manually installed.
 The following package was automatically installed and is no longer required:
   libllvm7
 Use 'sudo apt autoremove' to remove it.
 The following NEW packages will be installed:
   php-cli
 0 upgraded, 1 newly installed, 0 to remove and 1 not upgraded.
 Need to get 3,160 B of archives.
 After this operation, 12.3 kB of additional disk space will be used.
 Get:1 https://us.archive.ubuntu.com/ubuntu bionic/main amd64 php-cli all 1:7.2+60ubuntu1 [3,160 B]
 Fetched 3,160 B in 1s (2,978 B/s)

Preparing to unpack …/python-mysqldb_1.3.10-1build1_amd64.deb …
 Unpacking python-mysqldb (1.3.10-1build1) …
 Setting up python-mysqldb (1.3.10-1build1) …
 [ +++++++++++++++++++++++++++++++++++++++++++++++++++++++ ] OK
  OK
 Done.
  To EXIT Press x Key, Press ENTER to Continue
- Luego se instalará modsecurity
[+] Installing ModSecurity
 Reading package lists… Done
 Building dependency tree
 Reading state information… Done
 libxml2 is already the newest version (2.9.4+dfsg1-6.1ubuntu1.2).
 The following package was automatically installed and is no longer required:
   libllvm7
 Use 'sudo apt autoremove' to remove it.
 The following NEW packages will be installed:
   libxml2-dev libxml2-utils
 0 upgraded, 2 newly installed, 0 to remove and 1 not upgraded.
 Need to get 793 kB of archives.
 After this operation, 3,731 kB of additional disk space will be used.
 Do you want to continue? [Y/n] Y

Preparing to unpack …/modsecurity-crs_3.0.2-1_all.deb …
 Unpacking modsecurity-crs (3.0.2-1) …
 Setting up modsecurity-crs (3.0.2-1) …
 Processing triggers for libc-bin (2.27-3ubuntu1) …
 Setting up liblua5.1-0:amd64 (5.1.5-8.1build2) …
 Setting up libapache2-mod-security2 (2.9.2-1) …
 apache2_invoke: Enable module security2
 Processing triggers for libc-bin (2.27-3ubuntu1) …
 Done.
  To EXIT Press x Key, Press ENTER to Continue
- Luego, ejecute el siguiente comando para reiniciar apache2
[+] Setting UP OWASP Rules for ModSecurity
 [ +++++++++++++++++++++++++++++++++++++++++++++++++++++++ ]OK
 Enabling module headers.
 To activate the new configuration, you need to run:
   systemctl restart apache2
 Done.
  To EXIT Press x Key, Press ENTER to Continue


 [+] Optimizing Apache
 -- Enabling ModRewrite
 [ ++++++++++++++++++++++++++++++++++++++++++++++++++++++  ]Enabling module rewrite.
 To activate the new configuration, you need to run:
   systemctl restart apache2
 Done.
  To EXIT Press x Key, Press ENTER to Continue
- Ingrese su correo electrónico para recibir alertas
[+] Installing ModEvasive
 Type Email to Receive Alerts testemail.com
 Reading package lists… Done
 Building dependency tree
 Reading state information… Done
 The following package was automatically installed and is no longer required:
   libllvm7
 Use 'sudo apt autoremove' to remove it.
 The following additional packages will be installed:
   bsd-mailx
 The following NEW packages will be installed:
   bsd-mailx libapache2-mod-evasive
 0 upgraded, 2 newly installed, 0 to remove and 1 not upgraded.
 Need to get 80.5 kB of archives.
 After this operation, 256 kB of additional disk space will be used.
 Do you want to continue? [Y/n] Y
 Get:1 https://us.archive.ubuntu.com/ubuntu bionic/main amd64 bsd-mailx amd64 8.1.2-0.20160123cvs-4 [66.0 kB]
 Get:2 https://us.archive.ubuntu.com/ubuntu bionic/universe amd64 libapache2-mod-evasive amd64 1.10.1-3 [1

Processing triggers for man-db (2.8.3-2ubuntu0.1) …
 Setting up libapache2-mod-evasive (1.10.1-3) …
 apache2_invoke: Enable module evasive
 Done.
  To EXIT Press x Key, Press ENTER to Continue
- Instale Mod_Qos
[+] Installing Mod_Qos/Spamhaus
 Reading package lists… Done
 Building dependency tree
 Reading state information… Done
 The following package was automatically installed and is no longer required:
   libllvm7
 Use 'sudo apt autoremove' to remove it.
 The following NEW packages will be installed:
   libapache2-mod-qos
 0 upgraded, 1 newly installed, 0 to remove and 1 not upgraded.
 Need to get 202 kB of archives.
 After this operation, 744 kB of additional disk space will be used.
 Get:1 https://us.archive.ubuntu.com/ubuntu bionic/universe amd64 libapache2-mod-qos amd64 11.44-1build1 [202 kB]
 Fetched 202 kB in 3s (80.2 kB/s)
 Selecting previously unselected package libapache2-mod-qos

Building dependency tree
 Reading state information… Done
 E: Unable to locate package libapache2-mod-spamhaus
 Done.
  To EXIT Press x Key, Press ENTER to Continue
- Luego configurará Fail2ban
[+] Configuring Fail2Ban
 Configuring Fail2Ban……
 [ ok ++++++++++++++++++++++++++++++++++++++++++++++++++   ][….] Restarting fail2ban (via systemctl): fail2ban.service.
 Done.
  To EXIT Press x Key, Press ENTER to Continue
- Instalar paquetes adicionales
[+] Installing Additional Packages
 Install tree………….
 Reading package lists… Done
 Building dependency tree
 Reading state information… Done
 The following package was automatically installed and is no longer required:
   libllvm7
 Use 'sudo apt autoremove' to remove it.
 The following NEW packages will be installed:
   tree
 0 upgraded, 1 newly installed, 0 to remove and 1 not upgraded.
 Need to get 40.7 kB of archives.
 After this operation, 105 kB of additional disk space will be used.
 Get:1 https://us.archive.ubuntu.com/ubuntu bionic/universe amd64 tree amd64 1.7.0-5 [40.7 kB]
 Fetched 40.7 kB in 2s (24.3 kB/s)
 Selecting previously unselected package tree.
 (Reading database … 228842 files and directories currently installed.)
 Preparing to unpack …/tree_1.7.0-5_amd64.deb …
 Unpacking tree (1.7.0-5) …
 Setting up tree (1.7.0-5) …
 Processing triggers for man-db (2.8.3-2ubuntu0.1) …

Setting up apt-show-versions (0.22.7ubuntu1) …
 ** initializing cache. This may take a while **
 Processing triggers for man-db (2.8.3-2ubuntu0.1) …
 Install PHPUnit……….
 config-set succeeded
 Done.
  To EXIT Press x Key, Press ENTER to Continue
- Luego, instalará las dependencias de ipv6, instalará un refuerzo adicional del servidor y presionará sí para activar o desactivar la compatibilidad con USB
[+] Running additional Hardening Steps
 Running Additional Hardening Steps….
 Reading package lists… Done++++++++++++++++++++++++++   ]
 Building dependency tree
 Reading state information… Done
 Package 'at' is not installed, so not removed
 The following package was automatically installed and is no longer required:
   libllvm7
 Use 'sudo apt autoremove' to remove it.
 0 upgraded, 0 newly installed, 0 to remove and 1 not upgraded.
 Reading package lists… Done
 Building dependency tree
 Reading state information… Done
 The following package was automatically installed and is no longer required:
   libllvm7

Preparing to unpack …/libpam-cracklib_1.1.8-3.6ubuntu2.18.04.1_amd64.deb …
 Unpacking libpam-cracklib:amd64 (1.1.8-3.6ubuntu2.18.04.1) …
 Processing triggers for man-db (2.8.3-2ubuntu0.1) …
 Setting up libpam-cracklib:amd64 (1.1.8-3.6ubuntu2.18.04.1) …
 Securing Cron
 [ +++++++++++++++++++++++++++++++++++++++++++++++++++++   ]
Do you want to Disable USB Support for this Server? (y/n): n
OK
 Done.
  To EXIT Press x Key, Press ENTER to Continue
- Instale Unhide para mostrar los procesos ocultos que se ejecutan en segundo plano
[+] Installing UnHide
 Unhide is a forensic tool to find hidden processes and TCP/UDP ports by rootkits / LKMs or by another hidden technique.
 Reading package lists… Done
 Building dependency tree
 Reading state information… Done
 The following package was automatically installed and is no longer required:
   libllvm7
 Use 'sudo apt autoremove' to remove it.
 Suggested packages:
   rkhunter
 The following NEW packages will be installed:
   unhide
 0 upgraded, 1 newly installed, 0 to remove and 1 not upgraded.
 Need to get 46.6 kB of archives.
 After this operation, 136 kB of additional disk space will be used.
 Get:1 https://us.archive.ubuntu.com/ubuntu bionic/universe amd64 unhide amd64 20130526-1 [46.6 kB]
 Fetched 46.6 kB in 2s (25.9 kB/s)
 Selecting previously unselected package unhide.
 (Reading database … 228917 files and directories currently installed.)
 Preparing to unpack …/unhide_20130526-1_amd64.deb …
 Unpacking unhide (20130526-1) …
 Setting up unhide (20130526-1) …
 Processing triggers for man-db (2.8.3-2ubuntu0.1) …

Done.
  To EXIT Press x Key, Press ENTER to Continue
- Instalar la dependencia de Tiger
[+] Installing Tiger
 Tiger is a security tool that can be use both as a security audit and intrusion detection system
 Reading package lists… Done
 Building dependency tree
 Reading state information… Done
 The following package was automatically installed and is no longer required:
   libllvm7
 Use 'sudo apt autoremove' to remove it.
 The following additional packages will be installed:
   chkrootkit john john-data tripwire
 The following NEW packages will be installed:
   chkrootkit john john-data tiger tripwire
 0 upgraded, 5 newly installed, 0 to remove and 1 not upgraded.
 Need to get 6,868 kB of archives.
 After this operation, 24.0 MB of additional disk space will be used.
 Get:1 https://us.archive.ubuntu.com/ubuntu bionic/universe amd64 tripwire amd64 2.4.3.1-2 [1,647 kB]

Setting up john-data (1.8.0-2build1) …
 Setting up john (1.8.0-2build1) …
 For More info about the Tool use the ManPages
  man tiger
 Done.
  To EXIT Press x Key, Press ENTER to Continue
- Instalar rootkit hunter
[+] Installing RootKit Hunter Rootkit Hunter is a scanning tool to ensure you are you're clean of nasty tools. This tool scans for rootkits, backdoors and local exploits by running tests like:- MD5 hash compare- Look for default files used by rootkits- Wrong file permissions for binaries- Look for suspected strings in LKM and KLD modules- Look for hidden files- Optional scan within plaintext and binary filesFile updated: searched for 181 files, found 152 ***To Run RootKit Hunter *** rkhunter -c --enable all --disable none Detailed report on /var/log/rkhunter.log Done. To EXIT Press x Key, Press ENTER to Continue
- Entonces se sintonizará bashrc
[+] Tunning bashrc, nano and Vim
 Tunning .bashrc……
 [ ++++++++++++++++++++++++++++++++++++++++++++++++++++++  ]OK
 Tunning Vim……
 [ +++++++++++++++++++++++++++++++++++++++++++++++++++++   ]OK
 Tunning Nano……
 [ ++++++++++++++++++++++++++++++++++++++++++++++++++++++  ]OK
 Done.
  To EXIT Press x Key, Press ENTER to Continue
- A continuación, JShielder actualizará
[+] Adding Daily System Update Cron Job
 Creating Daily Cron Job
 [ +++++++++++++++++++++++++++++++++++++++++++++++++++++   ]
 Done.
  To EXIT Press x Key, Press ENTER to Continue
- La mayor parte de la configuración de JShielder será automatizada. Así que ahora instalará la artillería
[+] Cloning Repo and Installing Artillery
 fatal: destination path 'artillery' already exists and is not an empty directory.
 Welcome to the Artillery installer. Artillery is a honeypot, file monitoring, and overall security tool used to protect your nix systems.
 Written by: Dave Kennedy (ReL1K)

 Do you want to install Artillery and have it automatically run when you restart [y/n]: y

[] Adding artillery into startup through init scripts.. [] Triggering update-rc.d on artillery to automatic start…
 [*] Checking out Artillery through github to /var/artillery
 Cloning into '/var/artillery'…
 remote: Enumerating objects: 35, done.
 remote: Counting objects: 100% (35/35), done.
 remote: Compressing objects: 100% (35/35), done.
 remote: Total 1632 (delta 17), reused 3 (delta 0), pack-reused 1597

Setting Iptable rules for artillery
 [ +++++++++++++++++++++++++++++++++++++++++++++++++++++++ ]
 Artillery configuration file is /var/artillery/config
 Done.
  To EXIT Press x Key, Press ENTER to Continue
- Instale PSAD
[+] Install PSAD
 PSAD is a piece of Software that actively monitors you Firewall Logs to Determine if a scan
        or attack event is in Progress. It can alert and Take action to deter the Threat
    NOTE:    IF YOU ARE ONLY RUNNING THIS FUNCTION, YOU MUST ENABLE

 LOGGING FOR iptables
 iptables -A INPUT -j LOG   \
 iptables -A FORWARD -j LOG

 Do you want to install PSAD (Recommended)? (y/n): y

To EXIT Press x Key, Press ENTER to Continue
- Luego deshabilite los compiladores
[+] Disabling Compilers
 Disabling Compilers…..
 [ ++++++++++++++++++++++++++++++++++++++++++++++++++++++  ]
  If you wish to use them, just change the Permissions
  Example: chmod 755 /usr/bin/gcc
  OK
 Done.
  To EXIT Press x Key, Press ENTER to Continue
- Ahora asegure la carpeta tmp. Ingrese y
[+] Securing /tmp Folder
 ¿Did you Create a Separate /tmp partition during the Initial Installation? (y/n): y

Nice Going, Remember to set proper permissions in /etc/fstab
 Example:
 /dev/sda4   /tmp   tmpfs  loop,nosuid,noexec,rw  0 0
 Done.
  To EXIT Press x Key, Press ENTER to Continue
- JShielder restringirá el acceso a los archivos de configuración de Apache
[+] Restricting Access to Apache Config Files
 Restricting Access to Apache Config Files……
 [ ++++++++++++++++++++++++++++++++++++++++++++++++++++    ] OK
 Done.
  To EXIT Press x Key, Press ENTER to Continue
- Entonces restringirá las actualizaciones de seguridad desatendidas. Presione y
[+] Enable Unattended Security Updates
 ¿Do you Wish to Enable Unattended Security Updates? (y/n): y
- Se instalará dependencia contable
0 upgraded, 1 newly installed, 0 to remove and 1 not upgraded.
 Need to get 87.2 kB of archives.
 After this operation, 304 kB of additional disk space will be used.
 Get:1 https://us.archive.ubuntu.com/ubuntu bionic/main amd64 acct amd64 6.6.4-1 [87.2 kB]
 Fetched 87.2 kB in 2s (48.7 kB/s)
 Selecting previously unselected package acct.
 (Reading database … 229408 files and directories currently installed.)
 Preparing to unpack …/acct_6.6.4-1_amd64.deb …
 Unpacking acct (6.6.4-1) …
 Processing triggers for ureadahead (0.100.0-21) …
 Processing triggers for install-info (6.5.0.dfsg.1-2) …
 Setting up acct (6.6.4-1) …
 update-rc.d: warning: start and stop actions are no longer supported; falling back to defaults
 update-rc.d: warning: stop runlevel arguments (1) do not match acct Default-Stop values (0 1 6)
 Processing triggers for libc-bin (2.27-3ubuntu1) …
 Processing triggers for systemd (237-3ubuntu10.24) …
 Processing triggers for man-db (2.8.3-2ubuntu0.1) …
 Processing triggers for ureadahead (0.100.0-21) …
 OK
- Instalar autitd ingresar y
[+] Installing auditd
 Reading package lists… Done
 Building dependency tree
 Reading state information… Done
 The following package was automatically installed and is no longer required:
   libllvm7
 Use 'sudo apt autoremove' to remove it.
 The following additional packages will be installed:
   libauparse0
 Suggested packages:
   audispd-plugins

After this operation, 803 kB of additional disk space will be used.
 Do you want to continue? [Y/n] Y

Processing triggers for systemd (237-3ubuntu10.24) …
 Processing triggers for man-db (2.8.3-2ubuntu0.1) …
 Processing triggers for ureadahead (0.100.0-21) …
 Enabling auditing for processes that start prior to auditd
 [ +++++++++++++++++++++++++++++++++++++++++++++++++++++++ ]Sourcing file `/etc/default/grub'
 Generating grub configuration file …
 Found linux image: /boot/vmlinuz-4.18.0-25-generic
 Found initrd image: /boot/initrd.img-4.18.0-25-generic
 Found linux image: /boot/vmlinuz-4.18.0-15-generic
 Found initrd image: /boot/initrd.img-4.18.0-15-generic
 Found memtest86+ image: /boot/memtest86+.elf
 Found memtest86+ image: /boot/memtest86+.bin
 done
 Configuring Auditd Rules
 [ ++++++++++++++++++++++++++++++++++++++++++++++++++++++  ]

Done.
  To EXIT Press x Key, Press ENTER to Continue
- JShielder instalará y habilitará la estadística de sistema
[+] Installing and enabling sysstat
 Reading package lists… Done
 Building dependency tree
 Reading state information… Done
 The following package was automatically installed and is no longer required:
   libllvm7
 Use 'sudo apt autoremove' to remove it.
 Suggested packages:
   isag
 The following NEW packages will be installed:
   sysstat
 0 upgraded, 1 newly installed, 0 to remove and 1 not upgraded.
 Need to get 295 kB of archives.
 After this operation, 1,192 kB of additional disk space will be used.
 Get:1 https://us.archive.ubuntu.com/ubuntu bionic/main amd64 sysstat amd64 11.6.1-1 [295 kB]
 Fetched 295 kB in 2s (124 kB/s)

Processing triggers for systemd (237-3ubuntu10.24) …
 Processing triggers for man-db (2.8.3-2ubuntu0.1) …

 OK
 Done.
  To EXIT Press x Key, Press ENTER to Continue
- Instale arpwatch para monitorear el tráfico ARP. Ingrese y
[+] ArpWatch Install
 ArpWatch is a tool for monitoring ARP traffic on System. It generates log of observed pairing of IP and MAC.
 Do you want to Install ArpWatch on this Server? (y/n): y

Synchronizing state of arpwatch.service with SysV service script with /lib/systemd/systemd-sysv-install.
 Executing: /lib/systemd/systemd-sysv-install enable arpwatch

 OK
 Done.
  To EXIT Press x Key, Press ENTER to Continue
- Establecer la contraseña del cargador de arranque GNU. Más información sobre el funcionamiento del gestor de arranque es parte del curso avanzado de hacking ético del Instituto Internacional de Seguridad Cibernética (IICS, iiCyberSecurity)
[+] GRUB Bootloader Password
 It is recommended to set a password on GRUB bootloader to prevent altering boot configuration (e.g. boot in single user mode without password)
 Do you want to set a GRUB Bootloader Password? (y/n): y

Do you want to set a GRUB Bootloader Password? (y/n): y
 Enter password:
 Reenter password:
 PBKDF2 hash of your password is grub.pbkdf2.sha512.10000.15D5D8416652D02126C81FCF8C49A59B82F070F8010A13412C420345E97AA9CADC8798E7218A27105875C0C0950DC6A7EAC1D3DA92C32A6107FF572CB42A1D53.C05B506339CB3227411FF804E9587808E40CD72DD07CD749B004D324E9F90D2A4D092E6C9BE64E6E61DC71FB32A8DB00E65CA7BE6582975E30F64C9D46CD1C19
 Sourcing file `/etc/default/grub'
 Generating grub configuration file …

Found memtest86+ image: /boot/memtest86+.bin
 done
 On every boot enter root user and the password you just set
 OK
 Done.
  To EXIT Press x Key, Press ENTER to Continue
- Configuración de arranque seguro
Securing Boot Settings
 [ +++++++++++++++++++++++++++++++++++++++++++++++++++++++ ]
 Done.
  To EXIT Press x Key, Press ENTER to Continue


 [+] Setting File Permissions on Critical System Files
 [ +++++++++++++++++++++++++++++++++++++++++++++++++++++   ]
 Setting Sticky bit on all world-writable directories
 [ +++++++++++++++++++++++++++++++++++++++++++++++++++++   ]
: Read-only file system
 chmod: changing permissions of '/snap/core/7270/tmp': Read-only file system
 chmod: changing permissions of '/snap/core/7270/var/tmp': Read-only file system
 chmod: changing permissions of '/snap/core/6350/run/lock': Read-only file system
 chmod: changing permissions of '/snap/core/6350/tmp': Read-only file system
 chmod: changing permissions of '/snap/core/6350/var/tmp': Read-only file system
 chmod: changing permissions of '/snap/core18/1049/run/lock': Read-only file system
 chmod: changing permissions of '/snap/core18/1049/tmp': Read-only file system
 chmod: changing permissions of '/snap/core18/1049/var/tmp': Read-only file system

  OK
 Done.
  To EXIT Press x Key, Press ENTER to Continue
- Arriba puede ver que el permiso ha cambiado. Todos los cambios han sido completados. Luego se mostrará el mensaje de que JShielder ha configurado completamente Ubuntu para crear e implementar aplicaciones web


Trabajando como arquitecto de soluciones de ciberseguridad, Alisa se enfoca en la protección de datos y la seguridad de datos empresariales. Antes de unirse a nosotros, ocupó varios puestos de investigador de ciberseguridad dentro de una variedad de empresas de seguridad cibernética. También tiene experiencia en diferentes industrias como finanzas, salud médica y reconocimiento facial.
Envía tips de noticias a info@noticiasseguridad.com o www.instagram.com/iicsorg/
También puedes encontrarnos en Telegram www.t.me/noticiasciberseguridad